

Step 1
Create new file 1280 x 1024 px. Create a rectangular selection in the center of the image, hit Q to enter quick mask mode. Go to Filter > Pixelate > Crystallize, use small cell size and click OK. Hit Q again to return to normal mode. Hit Cmd+shift+alt+N to create a new layer. Press D then Cmd+Delete to fill selection with white. To remove selection press Cmd+D.

Step 2
Activate the burn tool with exposure 20%. Paint the paper until it looks dark and dirty. Go to Filter > Texture > Texturizer, use Texture: Canvas and click OK.

Step 3
Double click the paper layer to open the Layer Styles dialog and activate the Drop Shadow effect. Don’t worry with the settings, just click OK. This shadow is very flat and unrealistic, but we’ll fix it.

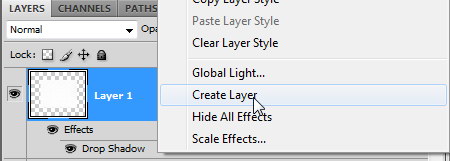
Step 4
From the Layers panel, right click Drop Shadow and choose Create Layer. This step will separate the Drop Shadow from the paper.
Step 5
Select the shadow layer, hit Cmd+T to transform it. Right click it and choose Warp. Move the handles until the shadow looks irregular, just like a real one.

Step 6
Activate the Gradient Tool, in the option bar and choose Linear and Mode: Difference. Create a random gradient, from top to bottom, bottom to top, left right, and right to left. Just go crazy!

Step 7
Go to Filter > Stylize > Emboss. Hit Cmd+L and move the white and black sliders to the middle.


Step 8
Hit Cmd+alt+G. Change blending mode to Overlay.

Conclusion
That’s it! You can turn this into a thin paper by lowering its opacity. Below is the final paper on a wood texture. Click here or click on the image to see it in full size.

The best thing about this technique is that the result is always different. Below are some alternative examples.

-------------------------- tutsplus


0 Comments