Wanna inspire yourself and at some time inspire someone else? On this Photoshop tutorial you can learn how to quickly create an inspiration frame.
Step 1
Start by creating a new document with 600×600 pixels. Fill layer with color #0593a4.
Step 2
Select the Custom Shape Tool and select one of standard Photoshop shapes (Registration Target 2), which you can see on the picture below. Set up foreground color as #02a0b3 and create shape similar to mine that you can see on the picture below.
With new layer selected, rasterize shape by going to Layer > Rasterize > Shape.
Step 3
Apply Filter > Distort > Twirl.
Step 4
It is time to add inspiration phrases. I’m going to add text by curve line. For this effect get out the Pen Tool (you need to make sure that you’re working with Paths instead of Shape Layers). Draw out your line using paths:
Now you need to type text across the curve line. Update foreground color to white color (#ffffff). Select Horizontal Type Tool, move cursor perpendicularly to circle’s line and when it will be similar to waht i have on image below type the text you want.
After typing, go to Layer > Rasterize > Type to rasterize layer. Add more lines of text repeating all steps to get something similar to what i have.
Step 5
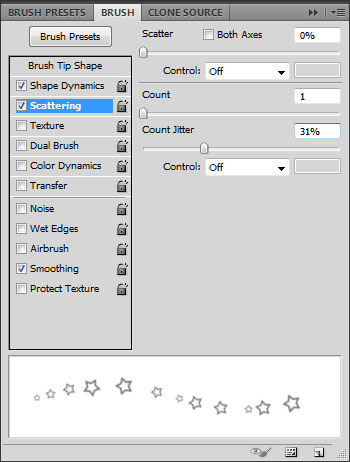
We need to add more decorative elements to our frame. Before we start adding decoration elements, select Brush Tool and choose one of standard brushes (Flowing stars) from Photoshop brushes gallery. If you can’t find brush start by resetting brushes so standard ones appear first.
Press F5 to change other values for this brush:
Set foreground color to #a0d6dc. Select Pen Tool (you need to make sure that you’re working with Paths instead of Shape Layers) and draw a new curve line:
Create a new layer. Right-click on line and select Stroke Path.
Choose Brush on next dialog box. Make sure there is a tick next to Simulate Pressure.
Right-click again and selecte Delete Path. Repeat process a few more times to have something similar to image below.
Step 6
We just need to add one dark spot to focus attention. Create a new layer above background layer. Select Elliptical Marquee Tool to create selection in the middle of canvas and fill selected area with color #005964.
Remove selection by pressing Ctrl+D and apply Filter > Blur > Gaussian Blur.
Final Image
-------------------------- photoshopstar


0 Comments